How to Change Strings on Your Guitar

Changing strings on you guitar can be frustrating, even a little frightening (“what if the string breaks and pops me in the eye?”). But whether you like to change them often to maintain that crisp, new-string sound, or if you like to leave them on for months or years until they’re caked with rust, or even if you only ever change a string when it breaks, if you play the guitar, you’ll have to change strings sometime.
It’s interesting to google the string-changing habits of players you admire and respected luthiers, but once you do so, you’ll find that tastes and opinions vary widely. Angus Young likes fresh strings every gig; Roy Buchanan once said he only changed his strings when one broke; Danny Gatton rubbed a mixture of beer and ashes on his strings in the studio, to simulate the sound he got in the natural environment of the venues where he performed.
The first thing you need to do is figure out what kind of strings you like. This might take a while. Strings come in different gauges--thicknesses--and different makeups (bronze, nickel, steel and so on). Search the web and you’ll find information, sometimes conflicting, on your favorite guitarists’ strings of choice. A lot of heavy-sounding players--Jimmy Page, Tony Iommi, and Billy Gibbons, for example--use very light strings; Jerry Garcia used heavy gauge strings. Sometimes your guitar helps with the choice: in general, acoustic guitars take heavier gauge strings than electric guitars, so, for example, light gauge acoustic strings are heavier than light gauge electric strings. The acoustic guitar in the pictures for this article has interior bracing that is not made to withstand anything heavier than light gauge strings. By trial and error, I’ve learned that I prefer D’addario 80/20 bronze strings, light gauge (.012”-.053”) on this and most acoustic guitars. One of the biggest enemies of strings is rust, and you can buy “coated” strings that might last a little longer, but also cost more; I’ve tried them, but in the end come back to uncoated strings.
Strings aren’t that expensive, but they’re almost always more at the store than you can find them for online; and the more you buy, the cheaper they are, so once you find a string that you’re sure you like, look for three-packs or ten-packs. If you are in doubt, don’t stress over which strings to use. If you’re a beginner, lighter gauge strings are easier on the developing caluses; if they feel too flimsy, move up a gauge on your next set.
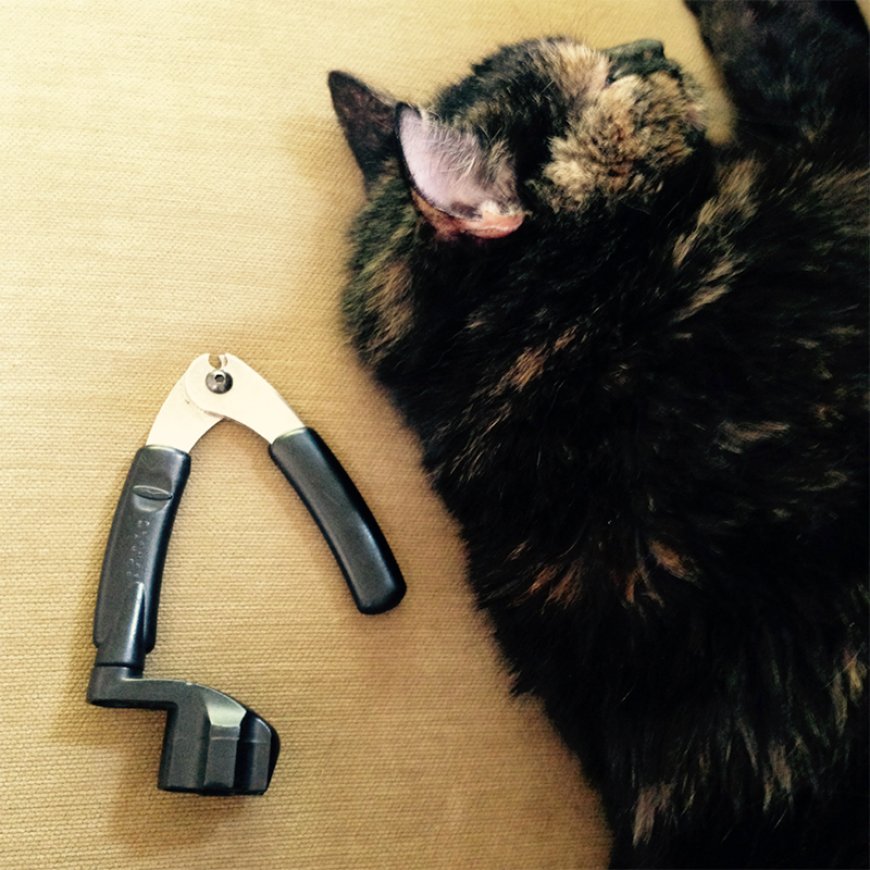
You don’t need any tools to change guitar strings, but I like to use a multi-tool that I nicked from Anomoanon guitar player Aram Stith years ago. It has clippers that I use to cut the old strings off (after loosening them so they don’t pop) and to trim the string ends of the new strings; and it also has a string-winder that makes short work of winding the strings to a gentle tightness. And that’s it. (Multi-tool pictured above).
For the purposes of clarity, I’ll give directions specific to a typical steel-stringed acoustic, 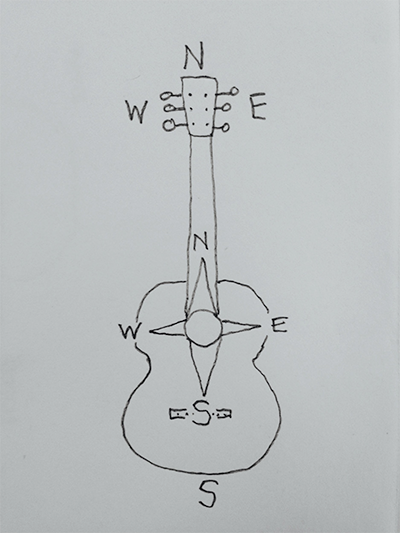 and talk about the guitar in terms of cardinal directions, so if you are facing the guitar, the headstock is up North, the bridge is down South, the three low strings are on the West side, and the three high strings are on the East side. Also, if you’ve never changed strings before, go ahead and read this whole article before attempting it.
I like to change one string at a time so that I can keep a constant tension on the neck. If you take off all the strings, it’s not going to hurt your guitar, but the huge reduction in string tension is more likely to slightly alter the set-up of the guitar. I used to start with the highest strings first, but these days I start with the lowest, reasoning that, since I like to try to keep it in tune throughout the change, when I get to my final string, the high E, the least amount of tension change is altered on the last string and my final tuning is easier. But that’s nitpicking; it doesn’t really matter that much in which order you change the strings.
Start by loosening the tuning peg for the old string until you have a lot of slack, then cut it in the middle, above the 12th fret, taking care not to scratch your guitar with the clippers, or just loosen it enough that you can get the old string off the peghead. At the bridge end, grab the string near where it’s held in place by the endpin. It can be a little tricky with the high strings, since they are flimsiest, but if you grasp it close enough to the base, it’ll have some stiffness. The string has a ball-end that is wedged up against the endpin. Shove the string down so that it becomes dislodged and then you should be able to pull out the endpin easily. There is an endpin-pulling tool, but I’ve never used one. I wouldn’t recommend using pliers on a stubborn endpin, as you could damage it. You might want to keep a little dish or cup nearby to keep your endpin from getting away from you until it’s time to put it back into the bridge. Remove the old string completely. I always cut my old strings in the middle, pull off the halves, and tie them in a knot so they’re easy to throw away.
One thing I like about D’addario strings is that the ball ends are color coded, so it’s easy to keep track of which string is which. Whatever strings you use will be coiled when you take them out of the pack. Take care uncoiling them to avoid putting a kink in any of them. Find the string you need--it’s not a bad idea to take a look at the packaging and figure out where each string is--and carefully uncoil it. Take the ball-end and put it in the hole in the bridge, then put the endpin back in and gently pull up on the string until it is wedged against the endpin; it won’t fully lodge in place until you get some tension on the string, so just get it so it feels gently snug. Endpins have a channel in one side, and that’s the side you want the ball to wedge against.
Now move to the headstock. Use the tuning peg to get the hole in the peghead so that it is in a West/East line, almost perpendicular to the line of the neck, but angled South slightly on the outer edge of the headstock--so, slightly South-West for the low strings, slightly South-East for the high strings. Thread the end of the string through the peghead; avoid kinking! Pull the string through leaving enough slack that when you grab the string over the 12th fret and pull up gently, still avoiding kinking, there is about six inches between the fretboard and the string*--a little less for the thicker strings and a little more for the thinner ones. Now it’s time for some intentional kinking: pinch the string on either side of the peghead, pull North on the outside and South on the inside.
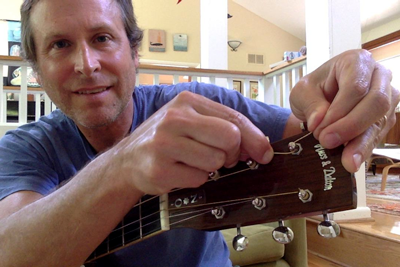
The last part is the trickiest. With the kink in the string, it is somewhat locked into the peghead. Pinch the string between your middle finger and thumb (I’m right handed, and do this with my right hand) just about an inch South of the peghead and give it some tension pulling South from the peghead toward the bridge and use your index finger to hold the string firmly down against the face of the headstock just beside and below the peghead--this is to keep the string wrapping along the bottom of the peghead. Using your other hand (I use my left), tighten the tuning peg, making sure that each consecutive wrap of the string around the peghead goes cleanly below the previous. You want to keep a steady firm but gentle tension both pulling South from the peghead and downward against the face of the headstock.
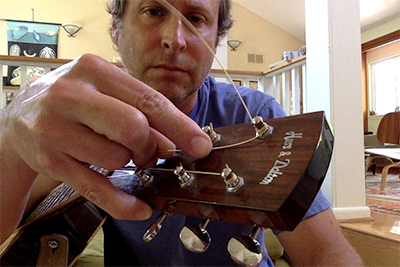 One last trick: keep an eye on the endpin. About the moment the string begins to feel taut enough that you can let go--you’ll begin to hear the sound of a loose note, increasing in pitch as you tighten--the endpin will probably begin to pop out. It might happen a little sooner, or perhaps a little later, but either way, the thing to do now is to stop tightening the peghead, press down on the endpin firmly with your thumb, get it as far down as you can and keep steady pressure on it as you tighten the string up to as close as your ear can get it to being in tune. One string down, five to go.
It’s not that hard, but don’t be bummed if you screw up a bit; if you are anything like me, you’ll have to learn from your mistakes. The low, wound strings tend to be easiest, since they have some texture and grip because of the winding; the biggest problem with them tends to be starting with too much slack and ending up with too many wraps to fit on the peghead and starting to wrap on top of previous wraps, which can make the string slip out of tune. The thinner, unwound strings are slinkier and more difficult to keep tension on while you’re tightening the tuning peg, and the biggest problem for me is keeping a good tension while I’m tightening--if the wraps aren’t tight enough, the coil of the string around the peghead can come loose and the wraps get out of order. Another common problem with the high strings is if you don’t start out with enough tension, too few wraps can lead to tuning instability. I’ve found that two or three wraps around the peghead for the low E is about right, three or four for the A and D (and G, if it is wound) seems ideal, and seven or eight for the unwound higher strings. But I’ve played many a guitar with an unsightly bulge of wraps around the low E peghead, and/or barely one wrap around the high E peghead. Those were string changes that I kind of screwed up. They didn’t look good, but I didn’t cut them off and start over, because they worked fine. I just did it better the next time.