Building Your Instructor Booking Page
Your instructor booking page is the space that allows students to search and match with you as a teacher.
The Basics
Be you. Teaching and mentorship relationships are based on personal connections. Keep in mind that people often relate to personalities, not resumes.
Own what you know (and what you don't). Highlight your expertise to put your best foot forward. This can help you find students with shared interests and may help avoid students with whom you might not be a great match (and that's OK).
Keep it concise. Brevity is king in the online world. Keep it short and sweet to ensure that students read everything.
If you want to edit your teacher profile, hover over the gear in the top right corner and click on My Settings, then click Instructor Profile.
To leave the editor at any point, click on the green View button at the top of the page.
Your Profile: What the Student Sees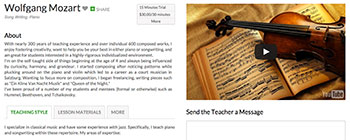
1. About
Discussion of you, including your training and areas of expertise, and other relevant details (recording, performing, other musical endeavors, etc.).
2. Rate
You'll set your own rates. And you also can offer a free 15-minute trial lesson here (which we recommend, because trials often result in subsequent paid lessons). If you want, you can disable listing your price so that it is not displayed until student checkout.
3. Picture or video
Your instructor profile picture/video will be displayed here. You have the option to post a YouTube link instead of uploading an image. If you do not have a video, your photo will appear instead.
4. Teaching Style, Lesson Materials, & More
What students can expect from you as a teacher.
5. Message System
Students can send you a message directly on your booking page.
6. Availability
This is the calendar of dates that students use to sign up for lessons. You'll want to ensure this information is kept up to date.
Editing Your Booking Page
If you've already populated your booking page, feel free to jump ahead to "pro tips."
If you'd like a step-by-step guide to getting your profile set up, continue reading below.
On the right side of this guide, you'll see some photos of what students will see when visiting a booking page; click on these photos to be able to see an exemplar booking page for Wolfgang Mozart.
Account
The email address you list here will be the one we use to send you Lessonface notifications, so make sure you use an address that you regularly monitor. You can update your email address and password at any time.
Set your local time zone, and Lessonface automatically converts your listed available times to your viewer's local time zone.
Your Account Avatar/Photo
You'll be asked to post an image/video as part of your Instructor Profile. Be sure also to upload an image under Account for use as an avatar with messages exchanged through Lessonface.
Now that the basics are out of the way, let's click save and move onto the Instructor Profile tab.
1. Availability
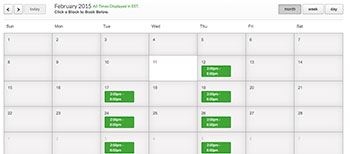 Lessonface will publish your availability for students to be able to sign up for available times; students will see a populated calendar at the bottom of your profile page.
Step 1 - select the date range
This tells the calendar interface when your availability is valid. If you want this box to reflect your current availability, make sure that the "to date" is set for the future (don't forget to check the year).
Step 2 - select the days and time
Input a time range (in 24-hour time mode) for when you are available.
Step 3 - select the days of the week
These are the days that you are available for the times you selected above.
Step 4 - save
Once you've added a time range, go ahead and save at the bottom of the page so you don't lose your information.
But what if I want to have different times available on different days of the week?
No problem! Click the "add another item" button. This will create a second Availability box. Enter the next time range when you are available. This will be cumulative; that is, each new set of times will be in addition to your previously added blocks of availability, but won't replace them.
I want to set up some blocks of time in my general availability when I can't teach.
You can add availability exceptions which will make certain blocks of time unavailable on your profile. You'll enter exceptions the same way that you added blocks of availability.
If you need to input multiple exceptions, you can click on the "add another item" button.
2. General Info
a. Skill Level
Help prospective students find you by advertising the skill levels that you teach. This is a place to be honest; for example if you don't want to work with beginners or aren't equipped to teach pros, it's OK say so.
b. In-person & Address
Don't worry about this at the moment; we're rolling this feature out later in 2015. You can leave the address fields blank.
Make sure to save and move on!
3. Personal Info
a. Photo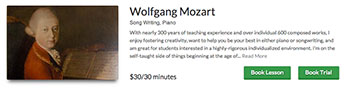
How to polish up that photo of yours:
|
b. Video
|
Some tips for choosing a great video:
|
c. Bio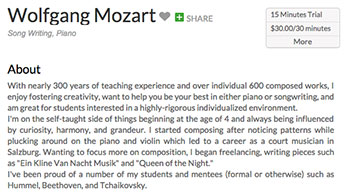
|
Some things to focus on:
|
d. Teaching Style
|
Some things to include:
|
e. Lesson Categories
4. Lesson Materials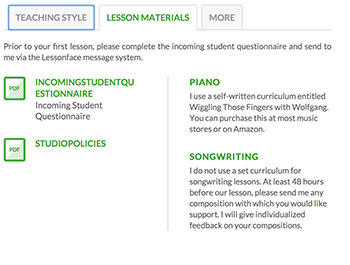
a. Describe your lesson materials
b. Make a statement
c. Upload your materials
Once an item has been uploaded, you can add a description or remove it.
5. More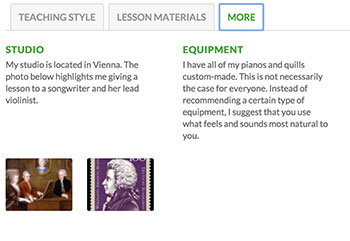
This section allows you to add extra information, such information about your studio or preferred gear. We recommend that you take some shots of your studio; this will help reinforce your professionalism and ensure students that they are in great hands.
6. Individual Lesson Rates
Step 1 - select the length of lessons you'll offer
Click on the boxes for each of the lesson lengths that you will teach. The most common classes taught are 30 and 60 minutes in length. If you aren't available for a particular lesson duration, be sure to uncheck the corresponding box.
Prospective students also really dig a free 15-minute trial lesson; this can also be a great way to start building a relationship.
Step 2 - determine the rate of each lesson type
Input the price of each lesson type in USD.
If you want to offer a 15-minute trial, enter "0.00" in the 15-minute box.
Step 3 - display rates option
Some teachers like openly advertising their rates; some don't. Whatever your preference, the choice is yours. By checking this box, your price will not be visible on your profile page until a student selects an available time for a lesson.
Step 4 - bundling
Select if you want to allow students to purchase bundles of lessons. If you select the 10 lesson bundle, students will automatically get a 10% discount when they purchase 10-lessons with you at one time.
Personal & Financial Info
There are two items you can change here:
1. Your type of account
You'll want to keep this set to student unless you will have other users for whom you will be managing their schedule.
2. Full Name
You can update your displayed name here if you prefer to have a different or stage name. You can change this at any time.

Start Lessons
Search for your perfect music, language, or arts teacher and start working towards your learning goals.

Start with a Free Trial
Teachers on Lessonface set their own rates and discounts. Participating teachers offer free trials.
Great Teachers, Great Lessons, Guaranteed
Learn more about the greatest universe for online music and arts lessons.
Lessonface Recitals, Open Mics, Masterclasses, and Jams
Welcome students of all ages and skill levels!