Teacher Frequently Asked Questions
Contact Us
You can contact Lessonface using any of the methods below. We will respond as quickly as we are able.
- Leave a message using the blue question mark bubble on the green left-hand menu (see above).
- Leave a voicemail at 800-211-7058 or 718-577-2100.
- Send a text message (SMS) to one of the numbers above.
- Email [email protected]
- Report an issue here.
General FAQ
- View the general Lessonface FAQ for students and prospective teachers at Lessonface.com/FAQ.
Get Involved at Lessonface
- Play at Lessonface's Open Mic Nights, and encourage your students to play too.
- Encourage your students to play in Lessonface Recitals, and attend as an audience member to cheer them on.
- Share your expertise with students in the Lessonface Forum.
- Ask questions and discuss topics of interest with fellow teachers in the Teacher's Lounge, which is accessible only to registered Lessonface teachers.
- Step up your online teaching game with pro tips from successful Lessonface teachers at our Teacher Success Webinars.
Teacher Frequently Asked Questions:
Getting Started
- How do I become a teacher on Lessonface?
- What qualifications are required of Lessonface teachers?
- What fees does Lessonface charge teachers?
- Watch a video overview of how teaching at Lessonface works
- What equipment do I need to teach online lessons?
- Setting up your profile
- How do I fill in my teacher profile?
- What should I write in the text of my teacher profile?
- How do I add a profile photo?
- How can I add additional photos or videos?
- How do I set up my teaching calendar?
- How do I set up my lesson offerings and rates?
- How do I change my lesson rates?
- How do I set up payment on Lessonface?
- How can I view how my profile appears to students?
- How can I make sure my profile is complete and ready for submission?
- How do I submit my profile for review?
- How do I edit my profile?
- How do I view my profile?
- How do I set up discounts?
- How do I set up special pricing for specific students?
- How do I offer free trial lessons?
- How do I hide my rates on my teacher profile?
- How does my profile move up the list of teachers?
- How do I get tags like "Popular" and "Student Favorite" on my profile?
- How do I get the "Background checked" tag on my profile?
- How do I change my account from a student account to a teacher account?
- What tips can you give me for a successful profile?
Students, Booking, and Pre-Lesson Questions
- How do I get students?
- How do I refer my own students to Lessonface?
- How do students book lessons?
- What options do students have for booking multiple lessons?
- How can I view students' profile and time zone details?
- How do I manage my contacts and active studio?
- How do I invite a student to a lesson?
- How do inquiries work?
- The student booked the wrong time, what can I do?
- I can’t make the time the student booked, what do I do?
- How do I reschedule?
- What is the cancellation and rescheduling policy for lessons?
- What's the difference between rescheduling, unscheduling, and canceling a lesson?
- How will I know I have a lesson?
- How much notice will I have for a lesson?
- How do I message several students at once?
The Lesson
- How can I test my zoom set up?
- How do I join a lesson?
- How does the student join the lesson?
- Zoom troubleshooting tips
- How do I add notes to a lesson?
- How do I upload attachments on a lesson?
- What do I do after the lesson?
- The student didn’t show up, or tried to cancel late, what should I do?
Lesson Recording
- How do I record the whole lesson?
- How do I record a part of a lesson?
- How do I disable recording?
- How do I enable recording?
- How do I watch a recording?
- Can the recording be downloaded?
After the Lesson
- How do I send my student materials and notes from the lesson?
- How can the student leave me a review?
- Why hasn’t the student booked another lesson with me?
Group Classes
- How can I apply to teach a group class on Lessonface?
- How do I view and message the class roster?
- How can I share materials with the entire class?
- How do I start the group class?
- How can students discuss group class topics with their teacher and classmates?
- Are group classes recorded?
Self-Paced Courses
Payment Questions
- The student missed the lesson, what do I do?
- When will I be paid?
- My payment isn’t correct, what’s up?
- Which payment method is best?
- Do I get a 1099?
Handy Links to Share with Students
- How It Works
- Student Help and FAQ
- Tips for Optimizing Zoom Audio Settings
- How to Subscribe and Book Multiple Lessons
Getting Started
What equipment do I need to teach online lessons?
Lessonface has Zoom video conferencing built in, which is very intuitive and works well with most computers and tablets. There are only three components absolutely required for teaching live online lessons:
- Computer or tablet
- Webcam
- Good Internet connection
Music teachers will want to optimize Zoom audio for their instrument. Depending on the subject you teach and your enthusiasm for electronics, you may want to step up your game with optional equipment.
How do I edit my profile?
Use the green menu on the left side of your screen to find and edit your Personal Info, Availability, Rates, and Payout. Click the small arrows to the right of the menu headings to expand them.
- To edit the About, Teaching Style, Profile Photo, Credentials, and Additional Media sections of your profile, go to Profile in the green menu bar, then Personal Info. See our profile set up guide for what sort of information belongs in each section.
- To modify your availability and teaching schedule, go to Calendar, then select Availability.
- To adjust your lesson prices, go to Earnings and choose Rates and Expertise.
- To change how you receive payments, go to Earnings and select Payments.
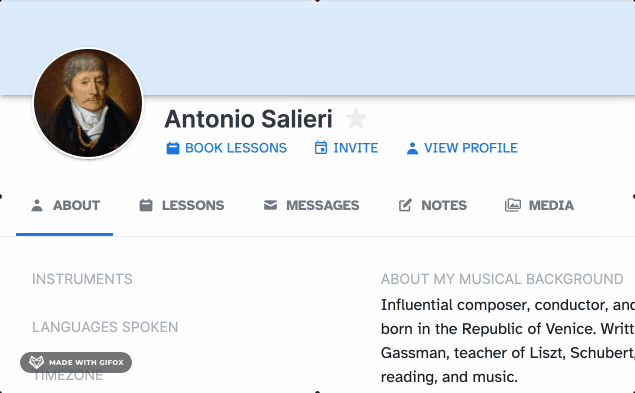
How do I view my profile?
To view your profile as students browsing the site see it, and to make sure things appear how you want them to, click "Profile" in the left hand menu bar, then "View Profile". Alternatively, go directly to lessonface.com/profile.
How do I set up discounts?
Go to the green left-hand menu, click Earnings, then select Discounts.
There are two categories of discounts:
- Price Lists enable you to set up special prices for selected students
- Discounts / Promotions allow you to create seasonal offers, subscription discounts, package discounts, and more
Note: Only one discount will apply per lesson package. If discounts overlap, the order shown on the page will determine precedence. Drag the discounts to reorder how they will be applied.
Be attentive when setting up discounts. You are responsible for honoring lessons booked at the rates and discounts you designate.
Price Lists
Use Price Lists to set special prices for selected students. You can use this feature to help out students in financial need and reward great students. It's also a good way to keep your rates stable for your first few students if you raise your prices later.
Go to Earnings in the left-hand menu bar, select Discounts, and click "Add Price List". Choose the price(s) you want to offer. Add the names of the students who should receive the special rate. Click "Create Price List" to save.
A student must be registered on Lessonface and be one of your contacts in order to appear as a student in Price Lists. A prospective student can become your contact by simply sending you a message on the platform.
Discounts / Promotions
Under Discounts / Promotions, there are several pre-existing discounts you can choose to activate:
-
Free Trial: Attract prospective students by offering a free trial lesson, so they can get to know you and your teaching style before committing to paid lessons. You may offer a 15-minute trial, 30-minute trial, or both. Free trials are restricted to one per student.
The first time you access your Discounts page, you can opt in to free trials by clicking "Add". Later, you can click "Edit" to change whether free trials are enabled or not.
-
Subscription Discount: Encourage students to subscribe to weekly lessons by offering a subscription discount. The default is set to 3%, but you can certainly go higher. Subscribers reserve the same weekly time indefinitely and tend to take more lessons than students who book in single lessons or packs. Read more about how subscriptions work here.
Opt in to a subscription discount by clicking "Add", and adjust the rate if you prefer.
Note: Lesson prices are locked in for students at the time of purchase, including for subscriptions. Changing your prices or subscription discount rate will affect new subscriptions only, and will not apply to ongoing subscriptions. If you want to change your lesson price or discount rate for a student who is already subscribed, first check with the student. Then, contact [email protected] to get the rate changed in the system.
-
Package Discounts: Encourage students to book several lessons at a time by offering discounts for packages of 5, 10, or 20 lessons. The default offers are 5% off for 5 or more lessons, 10% off for 10 or more lessons, and 20% off for 20 or more lessons. Opt in to package discounts by clicking "Add" for any or all of the options.
-
Seasonal Promotions: These are promotions set up by Lessonface for a limited time only. Examples of past promotions are "Back to School Promo - Buy 4 Get 1 Free" and "Rocktober BOGO Promo - Buy 1 Get 1 Free". Check your discounts page to see what's current.
Although it's possible to opt in simply by clicking "Add" next to the promotion, it's best to opt in from the Lessonface email newsletter that announces the promotion. That way you'll be included in the list of teachers Lessonface shares with students.
You can also create your own Custom Discounts to suit your needs and marketing plans:
-
Percent Off Lessons: You can choose any percent off you like and can designate a specific time frame for the offer. For example: "August special! I now offer 5 lessons for 20% off" or "Beginning of School Special! 30% off 10 lessons - start strong with lessons for the entire semester!"
Check the box "Limit Maximum Usage" to limit the offer to new students only, limit the maximum number of times a single student can use the discount, or limit the discount's maximum overall usage.
-
Buy X Lessons, Get Y Lessons Free: These encourage new students to start with multiple lessons and motivate ongoing students to book with commitment and consistency. You have the option to cap the number of times a discount may be used (overall and by a single student), set start and end dates, and limit the offer to new students only. Here are a couple of examples:
- "Back-to-School Special: Buy 5, Get 1 Free" - Offer a "starter package" for new students in September. Guide them throughout multiple lessons as they create a practice routine, see their progress over several weeks, and hopefully continue throughout the school year.
- "Summer Special: Buy 8 Lessons, Get 2 Free" - Encourage existing students to continue taking lessons during the summer months with a generous discount.
The discount is set so that if the student purchases X or more lessons, they will receive Y lessons free. For example, in the "Buy 5, Get 1 Free" example above, if the student purchases 5 lessons, or 6 lessons, or 10 lessons, they will get only one free. As long as you've limited the maximum usage per student to "1", the number of free lessons does not change.
Payments for these lessons to the teachers are spread across all the lessons, including the free one. If you offer "Buy 1, Get 1 Free," each of those two lessons would be paid out at 50% of your usual fee, with the Lessonface fee coming out as usual.
-
Add Private Lesson Promo for Group Class: If you have a group class coming up, you can set up a promotion to encourage students to book private lessons to complement their group instruction. This discount is limited by default to new students only.
Select the group class the discount should apply to, mark the category and lesson duration you'd like to offer the discount for. Then select the number of lessons. For example, you could set up a promotion titled "Classical Guitar Bootcamp: Four Lessons at 25% Off", so that any new students who enroll in your group class "Classical Guitar Bootcamp" can receive 25% off a purchase of four 30-minute lessons in classical guitar.
How do I offer free trial lessons?
Offering a free trial lesson is a great way to get to know prospective students, see if you're a good teacher-student fit, and encourage them to sign up for regular lessons. Free trial lessons are limited to one per student.
To offer a free trial:
- Enable free trials in Discounts. Click Earnings in the left-hand menu bar, then Discounts. Under the Discounts/Promotions heading, if you see "Disabled" next to "Free Trial", click "Edit" and check the box "Enabled". Select your free trial lesson duration (15-minute, 30-minute, or both), and click the "Save Discount" button.
-
Once enabled in Discounts, you can also edit your trial lesson durations on the Rates and Expertise page. Click Earnings in the left-hand menu bar, then Rates & Experience. Choose whether you would like to offer 15- or 30-minute trials (or both), and check the appropriate box(es).
If you would like to limit certain lesson durations to free trials only, check the "Free Trial Only" box next to that lesson duration. For example, if you want to offer 15-minute free trials but you don't want to offer 15-minute paid lessons, check the "Free Trial Only" box next to "Offer 15 min lessons / Free Trial Offered". Conversely, if you want to offer a 15-minute free trial and also 15-minute paid lessons, leave the box unchecked.
How do I hide my rates on my teacher profile?
You can hide your rates on the catalog page and your teacher profile via the Rates and Expertise page. Click Earnings in the left-hand menu bar, then Rates & Experience. Check the box at the bottom of the page that says "Hide My Rates", and click the "Save Base Pricing" button. When your rates are hidden, students can only see them when they click "Book a Lesson" on your profile.
How does my profile move up the list?
Teacher profiles are visible to students on each lesson subject page by popularity in that specific subject. The popular, rising popularity, and student favorite tags shown on the lesson subject pages are likewise based on lesson activity in that particular subject.
How do I get tags like "Popular" and "Student Favorite" on my profile?
The popular, rising popularity, and student favorite badges shown on the lesson subject pages are based on a teacher's lesson activity in that particular subject.
How do I get the "Background checked" tag on my profile?
Teachers who have a US Social Security Number can choose to have a background check and, pending approval, have a tag added to their profile that says "Background checked." Here's how to request the check:
- Background checks are processed by Yardstik and can be purchased at lessonface.com/ApplyForBackgroundCheck.
- Up to 48 hours after payment is confirmed, you will receive an email from our background check provider with the next steps.
- The whole process usually takes 3-4 days.
- When the process is completed, you will have the "Background Checked" badge added to your profile, and your profile will be displayed when students check the "Teaches Kids" box on the teacher catalog pages.
Only teachers with a United States Social Security Number can apply for a background check. Because the process varies in each country, Lessonface isn't able to provide background checks for teachers that don't have a US SSN. Parents are free to choose teachers without background checks to teach their kids, but those teachers are not listed when students use the "Teaches Kids" filter, and they do not have the background check badge displayed on their profile.
How do I change my account from a student account to a teacher account?
If you signed up for Lessonface using your Google account and ended up with a student account, or if you accidentally created a student account another way, contact [email protected] and we will change it for you. You'll need to be set up with the correct account type in order to complete your instructor profile and begin teaching.
Students, Booking, and Pre-Lesson Questions
How do I get students?
Lessonface offers several tools for promoting your teacher profile including sharing widgets and your Outreach panel. View our article How to Get Students on Lessonface for more of an overview.
How do students book lessons?
Students will book lessons directly on the teacher’s profile page, unless the teacher has not included any availability.
Teacher has availability: Students click on the button “Book a Lesson” and choose the lesson type, duration, and skill level. Then the student will go to a shopping cart where they can choose to schedule the lesson and choose the lesson package. On the final checkout page, they will pay for lessons using credit card or Paypal. If the student has credits in their account, the credits will automatically be deducted on the checkout page as well.
Teacher does not have availability: If a teacher has not included availability, they will need to invite students to lessons with a date and time already selected.
How can I view students’ profiles and time zone details?
Find the Contacts section on your dashboard. Any student you've had a lesson with or contacted via messages will appear in your Contacts. Click the student's name to view their profile, which includes time zone and other details. Teachers using Lessonface Beta can also use a student's profile page to send a message, create a lesson, view past and upcoming lessons, and add lesson notes, materials, or assignments.
How do I manage my 'Contacts' and 'Active Studio' lists?
Teachers using Lessonface Beta have three categories for managing and navigating student contacts on Lessonface:
1. All Contacts: This tab shows all your student contacts on Lessonface, including students you've messaged through inquiries, students who have messaged you, students who have taken a trial lesson, and students who take regular lessons.
2. Active Studio: Click the star next to a contact's name to make that student a part of your active studio. Click the star again to move a student from your active studio and into the “All” contacts tab.
3. Archived Contacts: If you have students who have finished taking lessons, you can “archive” a student which will grey out their profile in the All Contacts tab. (You can easily restore archived students from the archive tab as well.)
Need to reorganize your contacts? Clear your entire active studio by clicking the settings button shown at the bottom of the contacts panel, then “Clear Active Studio.” 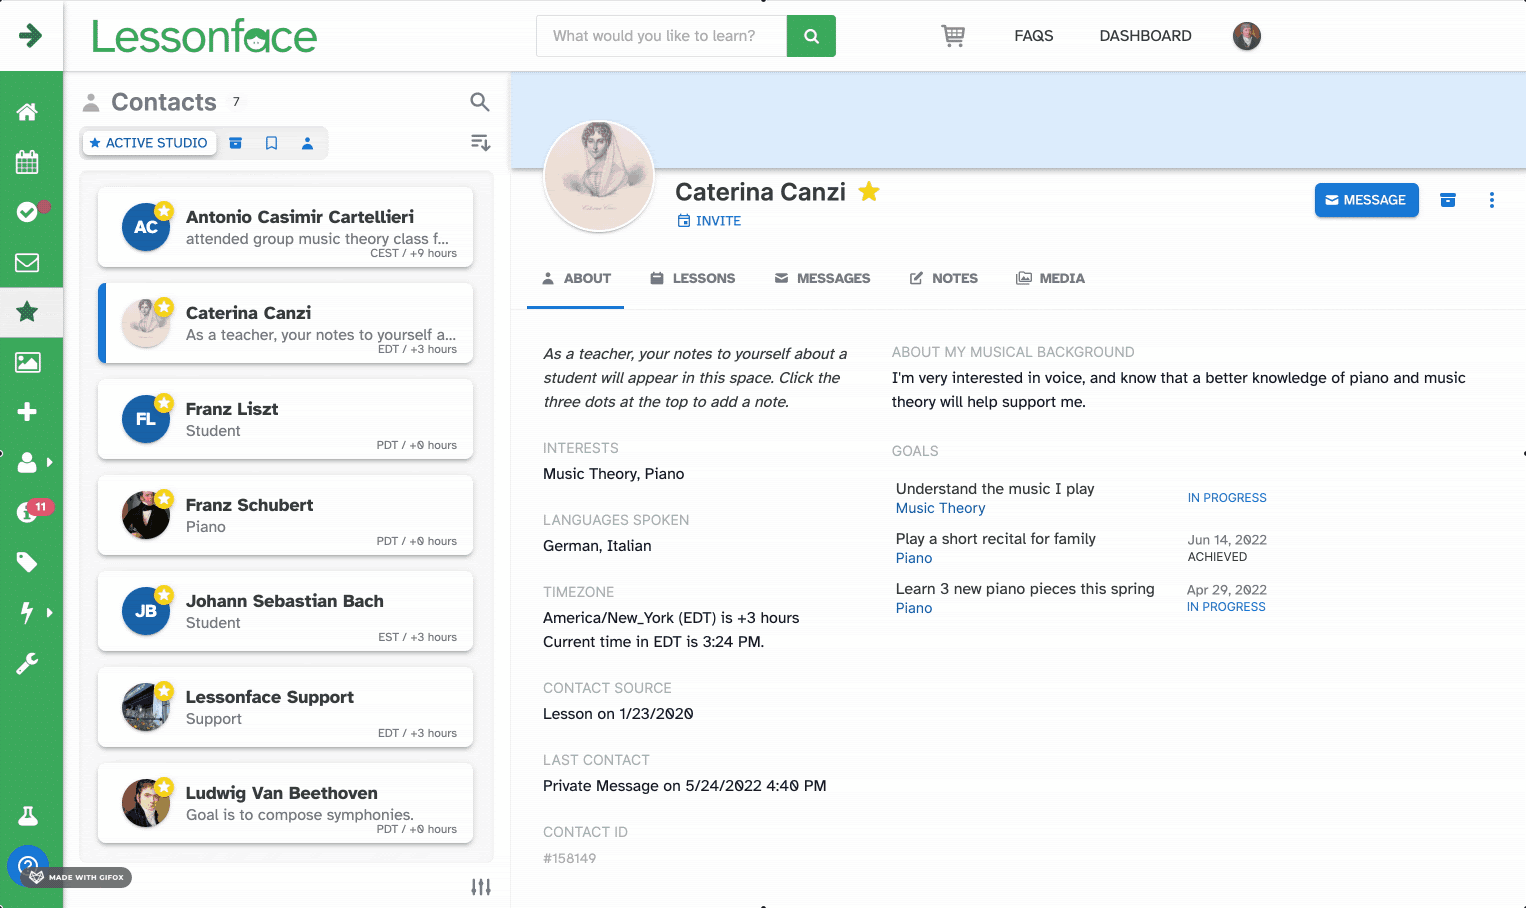
How do inquiries work?
When a student is looking for lessons on Lessonface, instead of (or in addition to) choosing a specific teacher to contact and book, they can post an inquiry on the website with information such as lesson category, learning goals, experience level, and the date they're looking to get started.
Inquiries are site-wide posts that only featured Lessonface teachers can see and respond to. Teachers are able to see and respond only to inquiries created for categories that they teach. Important: Inquiries are not directed specifically to one teacher.
Email notifications for when an inquiry is posted are not sent to every teacher in the category, but still, all featured teachers have access to all the inquiries posted for their categories by coming to this page. Notifications are sent to the five teachers with the most lessons in the category, plus five teachers chosen at random by the system.
Learn good strategies for responding to inquiries here.
The student booked the wrong time, what can I do?
If a student booked the wrong time, they can reschedule the lesson themselves up to 24 hours ahead of the lesson time (the old and the new lesson time). If the lesson is occurring within 24 hours, rescheduling is at the teacher's discretion and must be done by the teacher. This can be done by going to the lesson schedule and clicking on the particular lesson to open the lesson page. On the lesson page, click 'Reschedule' and choose the new time.
I can’t make the time the student booked, what do I do?
It is important to make sure your Lessonface calendar is up to date, but there may be times something comes up. If you can’t make a lesson with a student, send him/her a message right away and ask if they mind rescheduling. As the teacher, you are able to reschedule the lesson at any time -- even if the time for the lesson has passed. Instead of cancelling the lesson, it is best practice to keep the lesson on your schedule until you and the student have decided on a time. Once you have confirmed a new time with the student, you can reschedule the lesson to the new time. If a student prefers a refund instead of a rescheduled session, click "Cancel", or reach out to [email protected].
How do I reschedule?
Up to 24 hours ahead of the lesson time (the old and the new lesson time), the teacher or student may reschedule the lesson. If the lesson is occurring within 24 hours, only the teacher may reschedule. This can be done by going to the lesson schedule and clicking on the particular lesson to open the lesson page. From there, click 'Reschedule' and choose the new time.
Be fair to your student and give them as much notice as possible when you need to reschedule. While teachers are technically able to reschedule at any point, you should stick to the same cancelation policy that you hold your students to. In other words, if you are strict with students about the 24-hour policy and do not permit late reschedules, you should not reschedule after the 24-hour mark, either.
What is the cancellation and rescheduling policy for lessons?
If you can’t make a scheduled lesson, you must reschedule, unschedule, or cancel the lesson at least 24 hours before the lesson start time. More notice is always appreciated.
To reschedule, unschedule, or cancel a lesson before the 24-hour mark, click on the word “Schedule” in Lessons section of your Dashboard. Your upcoming lessons will be displayed in chronological order. Click on the specific lesson, and then choose Reschedule, Unschedule, or Cancel according to your preference. If you need to cancel a lesson, teachers appreciate receiving a brief explanation when possible.
After the 24-hour mark, you may not reschedule, unschedule, or cancel a lesson. You may write your teacher a message to let them know you won’t make it. However, unless your teacher makes an exception to the policy, you will be charged for the lesson whether you attend or not. Please check with your individual teacher about their specific policies regarding late cancellations and no-shows, as these may vary.
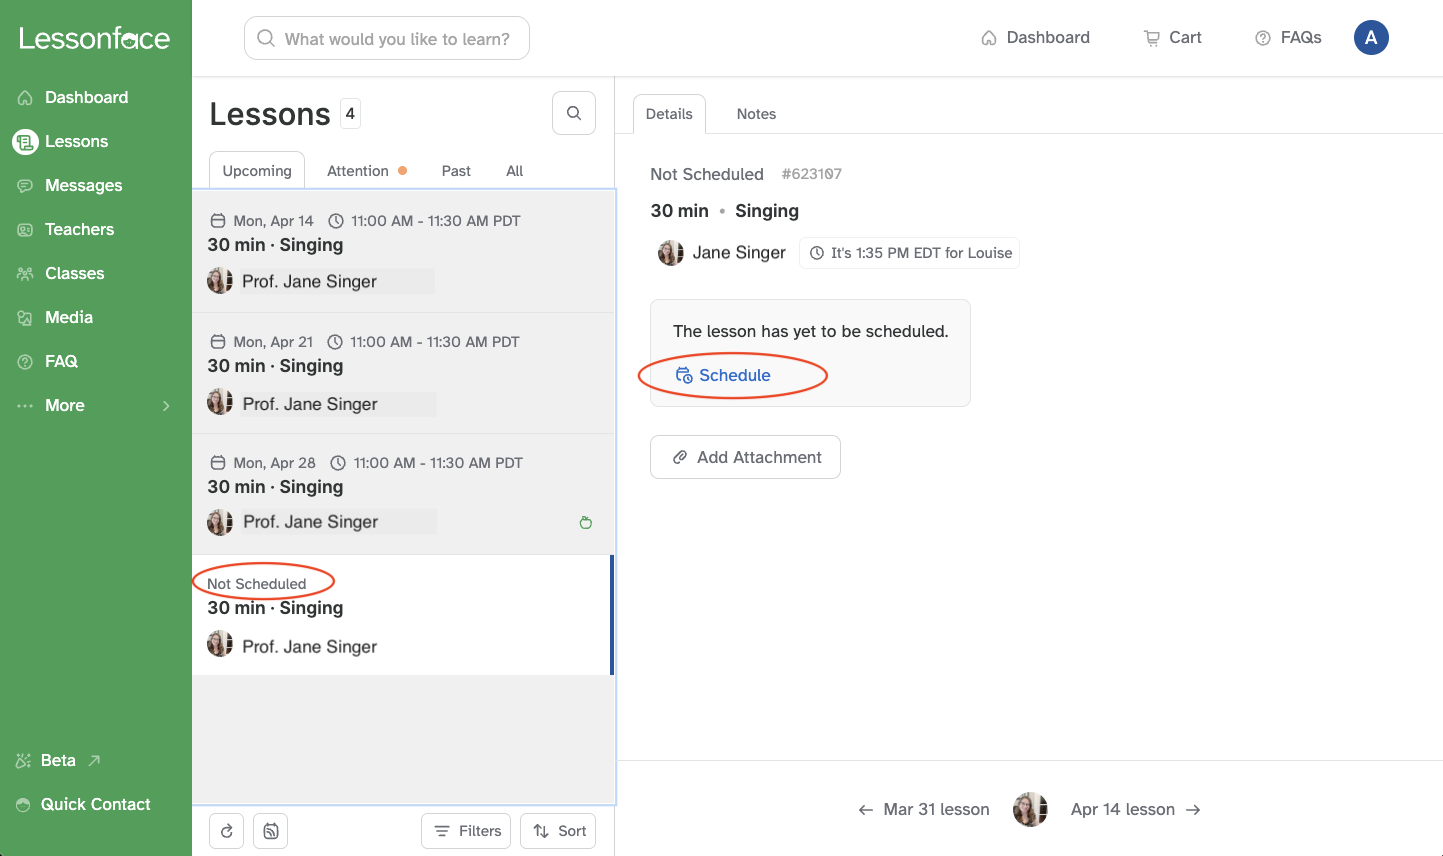
What's the difference between rescheduling, unscheduling, and canceling a lesson?
- Rescheduling a lesson immediately changes it to a different day and/or time. Both you and your teacher will see the new appointment on your schedules.
- Unscheduling a lesson removes it from the schedule of upcoming lessons without setting a new time. The lesson remains confirmed but appears as "Schedule Pending" in your lesson list. This means you won't need to go through checkout again when you're ready to schedule a new time.
- Canceling a lesson ends the appointment completely. Credits for the lesson automatically return to your account, and you'll need to go through the checkout process again if you wish to book a new lesson.
When to use unscheduling:
- When you need to postpone a lesson but aren't yet sure of your availability
- When you want to take a temporary break from lessons without canceling completely
- When a scheduled lesson didn't take place for some reason, and the teacher wants to let the student choose the new date/time
You can view your unscheduled lessons at the bottom of your Upcoming Lessons list. Click "Schedule" when you're ready to set the time and date.
How will I know I have a lesson?
Teachers receive email notifications for lesson booking, time changes for lessons, messages received, and other important events. Be sure to keep your email up to date on your Lessonface account and to add [email protected] to your address book.
How much notice will I have for a lesson?
Teachers will always have at least 24 hours notice for a lesson that is booked or rescheduled.
How do I message several students at once?
You can message a group of students by clicking the compose button on your Dashboard or Messages page and adding your students from the dropdown menu. Add as many names as needed. Group messages on Lessonface work the same way as in a "bcc" email: the recipients are not able to see the list of contacts the message was sent to. When a user replies, the reply is sent only to the teacher.
The Lesson
How can I test my Zoom set up?
Teachers and students can test and download Zoom by visiting the “Video Test Room.” This option can be found in the drop down menu in the top right corner of the screen, right of shopping cart image and links to FAQs and Dashboard. Click the circle with your profile photo (if you have a profile image) and choose "Video Test Room".
How do I join a lesson?
There are two ways to join a lesson, through your dashboard or via email.
1. Dashboard: On your dashboard, the “Lesson Schedule” displays the details for the next several upcoming lessons. Thirty minutes prior to the lesson start time, a green “Join” button will appear. If you don't see it, try refreshing your webpage. Once you are ready to join the lesson, click the lesson to bring up lesson details and a "Join" button. When you click on the join button, this will open Zoom and take you to the meeting with your student.
2. Email: 24 hours prior to the lesson time, you and your student will receive an email with a subject line “Upcoming Lesson Details.” Underneath the text describing the lesson time, duration, and type, there will be a link that says “Click here to join the session.” You can use this link the enter the lesson beginning 30 minutes prior to the lesson start time.
How does the student join the lesson?
Your student has the same options to join the lesson as you do. They can either join via their dashboard or by clicking the link in their upcoming lesson details email sent 24 hours prior to the lesson.
Zoom troubleshooting tips
If you are experiencing trouble with Zoom, there are a couple of quick fixes that you can try. First, you can try ending the call and joining in again. This is useful if the audio sounds distorted and you’re sure your audio has been working fine previously. If this doesn’t work, the next thing to try is a computer restart. This solves most of the problems we see occurring with using Zoom.
If these two strategies don’t work, visit the video test room to see if the problem persists. This can help diagnose if the issue is occurring on your end or the student’s. If nothing seems to be working, contact us and we can help to diagnose the issue. If this is a timely issue and the Lessonface office is closed, you can try reaching out to Zoom’s customer support. In an emergency, it is totally acceptable for students and teachers to meet using an alternate video conference service if this is available to both the teacher and student.
For ideal sound in music lessons, both students and teachers should follow these instructions for optimizing your Zoom audio.
How do I add notes to a lesson?
To add notes to a lesson, open the Lesson Page from your Lesson Schedule. This will bring up details about the lesson that include "Notes", "Attachments", "Assignments", and "Recordings. Click the plus sign to add your notes. They will appear along with any previous notes you have written on that lesson.
How do I upload attachments on a lesson?
Open the Lesson Page from your Lesson Schedule. Select the "Attachments" tab, and add the file(s) you want to share with the student. They will appear along with any previous files you have uploaded.
What do I do after the lesson?
After the lesson has been completed, be sure to click the "Acknowledge" button to confirm it happened. You can find all the lessons you need to acknowledge by the drop down menu in the Lessons section of your Dashboard and clicking Needs Attention. Teachers using Lessonface Beta can filter lessons to show those that need acknowledgement. You must acknowledge lessons to be paid for them. Additionally, it would be great to reach out to the student via message or the notes section to reiterate any points you made during the lesson or just to say great job!
The student didn’t show up, or tried to cancel late, what do I do?
All teachers are protected by our 24-hour cancellation policy. If your student cancels at the last minute or doesn't join the lesson, you can acknowledge as “completed, unsuccessfully”. That generates the payment but prevents the student from leaving a review. If you prefer, you may reschedule the lesson with the student instead. Important: The teacher must be present on Zoom for at least 50% of the time of the lesson in order to acknowledge a lesson as “completed, unsuccessfully.” One idea for smoothing a missed lesson with a student would be to spend some of the time waiting for the student recording exercises or example songs for the student to review later.
Lesson Recording
How do I record the whole lesson?
The recording option is only available on the teacher’s end of Zoom, so if you or your student would like to record a lesson, this will need to be done by the teacher. To record the whole lesson, just hit the record button in the menu that pops up in the bottom of Zoom. Zoom will let you know that the lesson is being recorded and you’ll be rolling! Recordings are posted to the lesson page after the lesson time.
How do I record a part of a lesson?
The recording option is only available on the teacher’s end of Zoom, so if you or your student would like to record part of a lesson, this will need to be done by the teacher. To initiate recording, hit the record button in the menu that pops up in the bottom of Zoom. Once you’ve started recording, you will have an option to then stop recording or pause recording. If you know you’re finished recording for that lesson, click on the square button on the right half of where the record option previously was to end the recording. If you’d like to pause the recording and record a part of the lesson later on, click pause, and return to this button later to resume recording.
How do I disable recording?
To disable recording, visit the settings at the bottom of the left hand menu of your dashboard. You will be brought to a section that says “Account” with a tab labeled "Site" to the right of it. Click “Site,” and scroll down to find the section labeled Lesson Recording. There is a box here that says “Do not allow my lessons to be recorded for later review.” To disable recording, check this box and click save on the bottom of the page. If you decide later to enable recording again, visit this page, uncheck the box, and hit save.
How do I enable recording?
visit the settings at the bottom of the left hand menu of your dashboard. You will be brought to a section that says “Account” with a tab labeled "Site" to the right of it. Click “Site,” and scroll down to find the section labeled Lesson Recording. There is a box here that says “Do not allow my lessons to be recorded for later review.” To enable recording, uncheck this box and click save on the bottom of the page. If you decide later to disable recording again, visit this page, check the box, and hit save.
How do I watch a recording?
In order to watch a lesson recording, you will need to visit the lesson page associated with the recording. Find the lesson under "Past Lessons" or "All Lessons" and click to view the lesson page. Click the "Recordings" tab to view any recordings captured during the lesson. Teachers using Lessonface Beta will see recordings listed as soon as the lesson page is opened underneath notes and attachments. You can also click the film icon to see recordings by themselves.
Can the recording be downloaded?
There is no download button on the recording, but lessons may be right-clicked and downloaded.
After the Lesson
How do I send my student materials and notes from the lesson?
To send your student materials and notes from the lesson, you have a couple options.
1. Send material via Lessonface message: Find the student in your contacts section of your dashboard and click "Message". You can attach most file types to the message of up to 1GB in size. Attach your files, write a note, and click "Send"
2. Attach material to a specific lesson: Find the lesson you would like to attach material to in your “Past Lesson” section and open the lesson page. You'll see tabs for "Notes", "Attachments", and "Recordings". Teachers using Lessonface Beta will see a paperclip icon instead. To attach files, click the “Attachments” tab or paperclip icon and then “Add Files.” To write notes associated with the lesson, click the “Notes” tab or (in Beta) pencil-and-paper icon and then “Add Note.”
How does the student leave me a review?
When you have marked a lesson completed, the student is prompted to leave their review on the lesson. If you mark a lesson as "Completed, unsuccessfully" (for example, if the student did not attend and did not give adequate notice), the student is able to leave a review of the platform but not of the particular lesson.
Why hasn’t the student booked another lesson with me?
It is best practice to follow up with a student after the lesson. Even if you went over a full set of goals and lessons with them in the lesson, some students still need encouragement to continue booking. Send them a message asking how they're doing with the material you taught, and invite them to their next lesson. Read our advice on retaining long-term students here, view our on turning first lessons into long-term students here, and encourage your students to subscribe to lessons.
Group Classes
How can I apply to teach a group class on Lessonface?
You can submit group class proposals to us by going to the Teach Group Classes page.
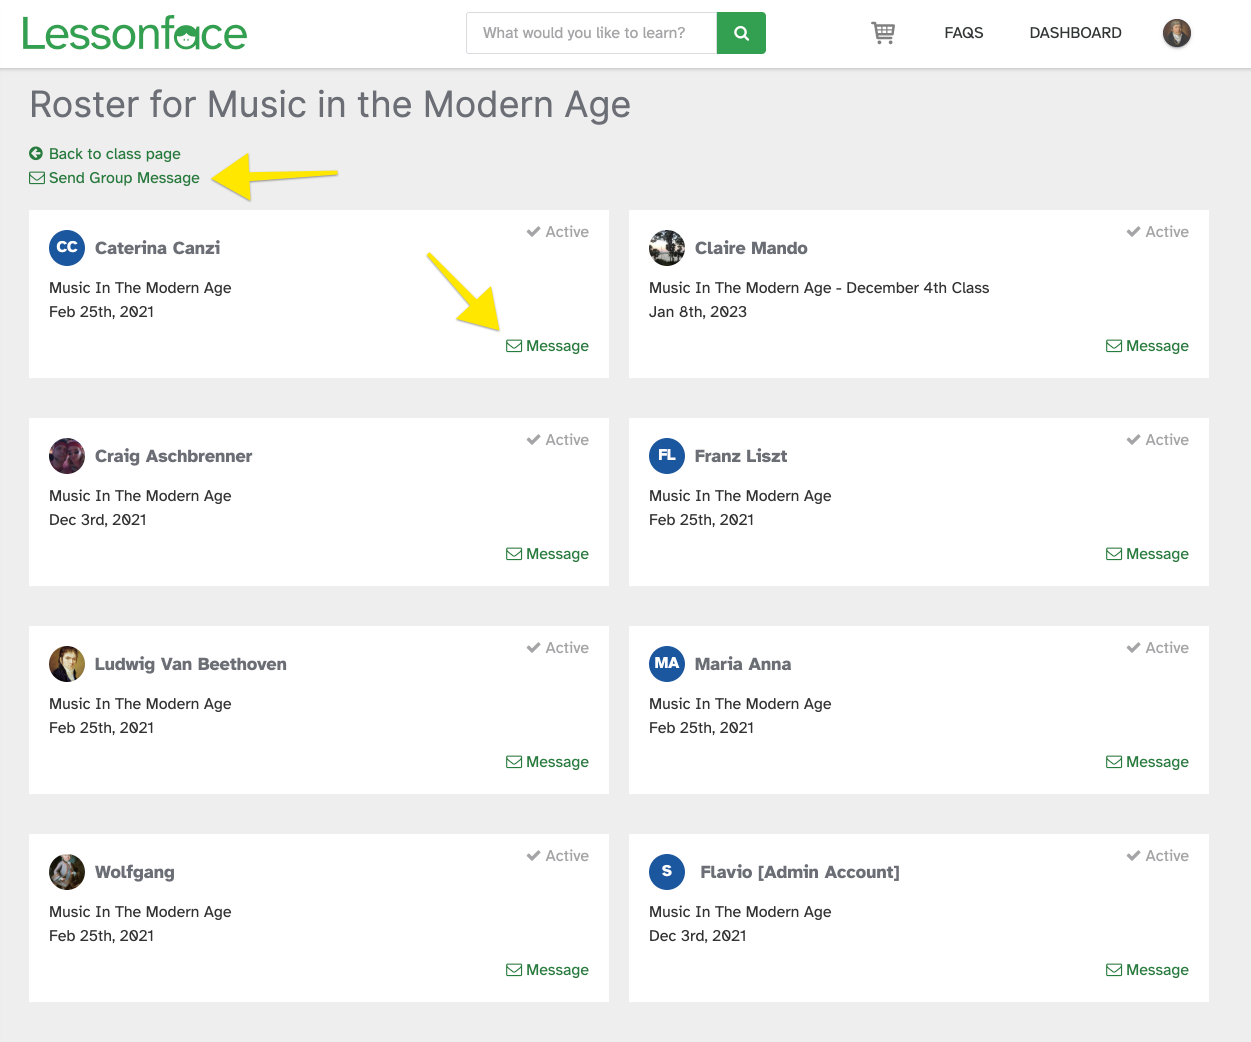
How do I view and message the class roster?
Once your group class is open for enrollment, you can find the class page under My Classes and Events on your Dashboard. Click on any class date listed to access the class page. The class page features four sections: Classroom, Discussions (for adult classes), Materials, and Roster.
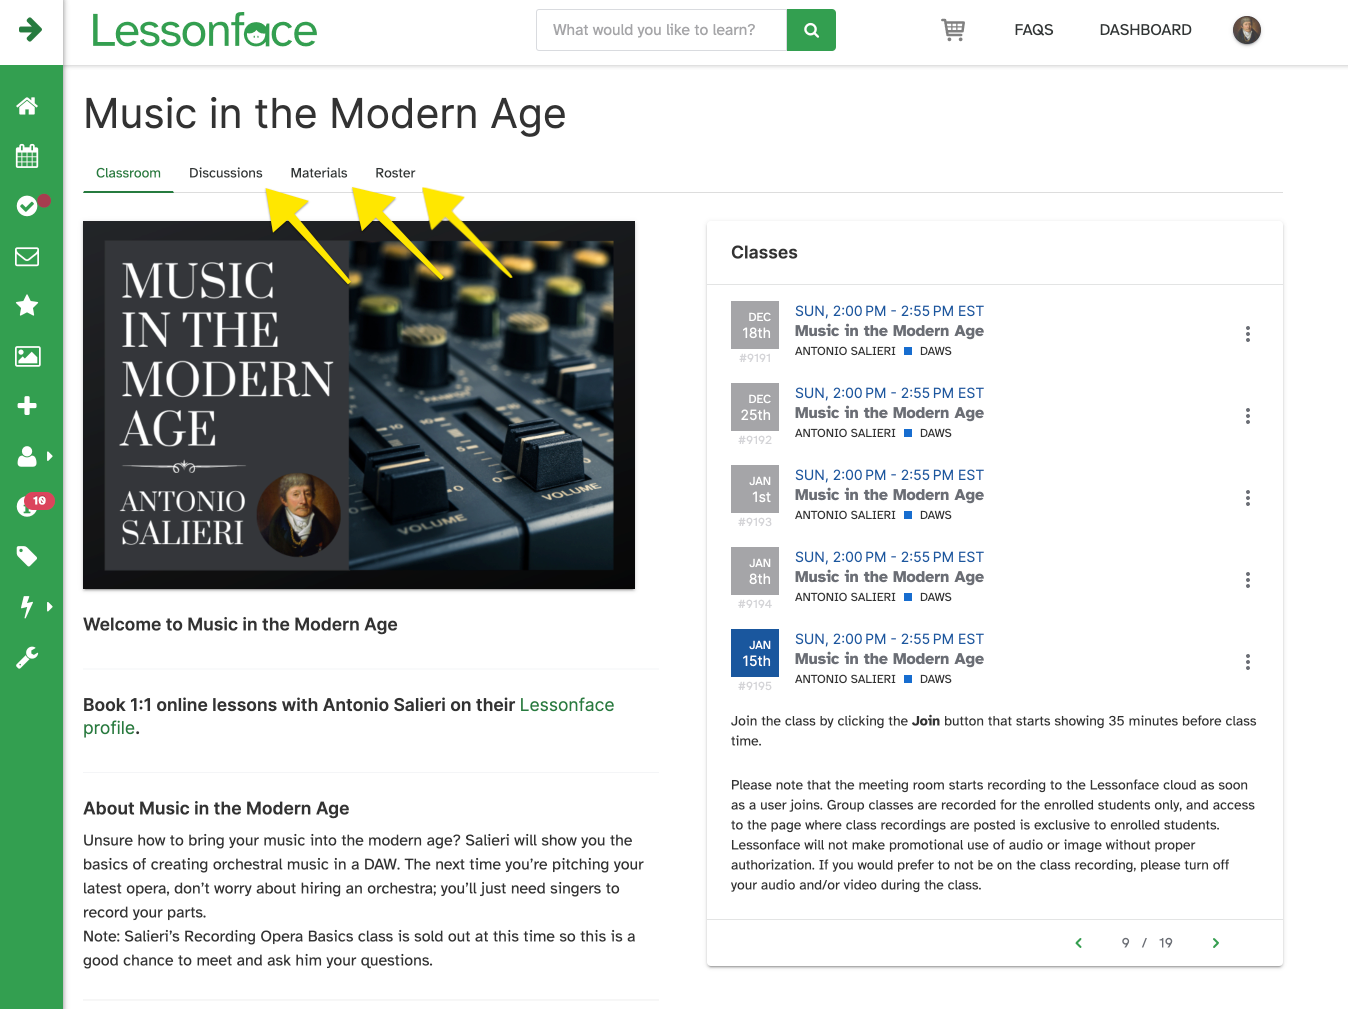
To message students in the class, go to the "Roster" section and click "Send Group Message" or, if you want to message a single student, click "Message" next to the student's name. Group messages on Lessonface work the same way as in a "bcc" email: The recipients are not able to see the list of contacts the message was sent to, and when a user replies, the reply is sent only to the teacher.
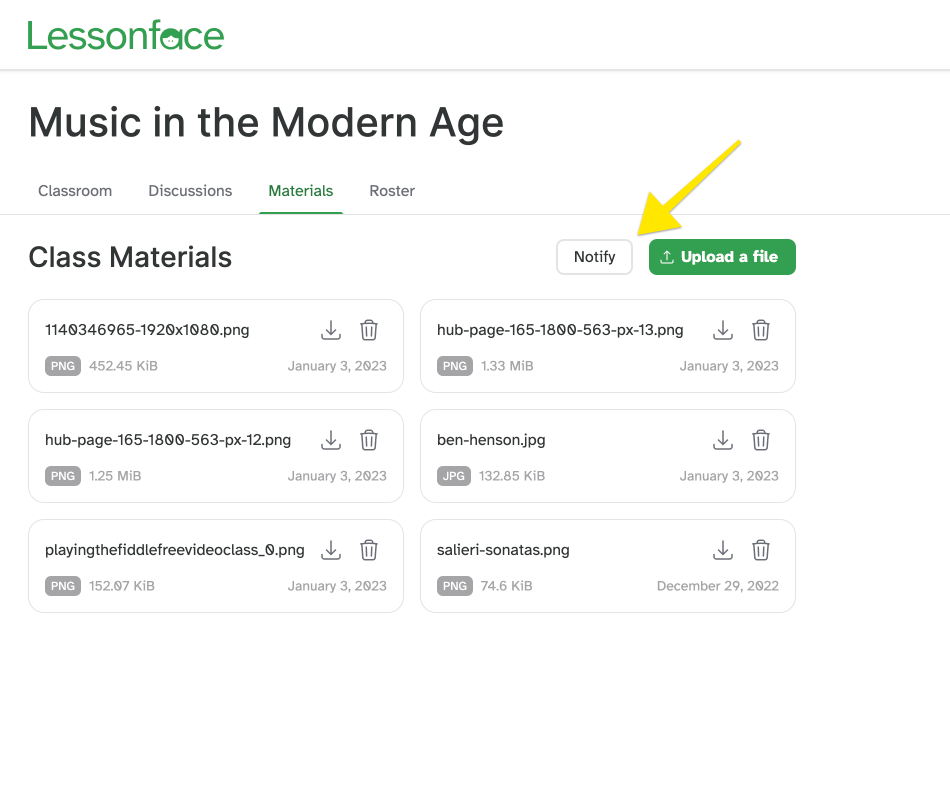
How can I share materials with the entire class?
You can upload and access class materials on the Materials tab. After uploading class materials, use the Notify button to notify the class of the updates. Students will receive a single email notifying them to check out the Materials section of the page and review their materials. Important: Make sure to click the "Notify" button only once to avoid multiple emails to the group.
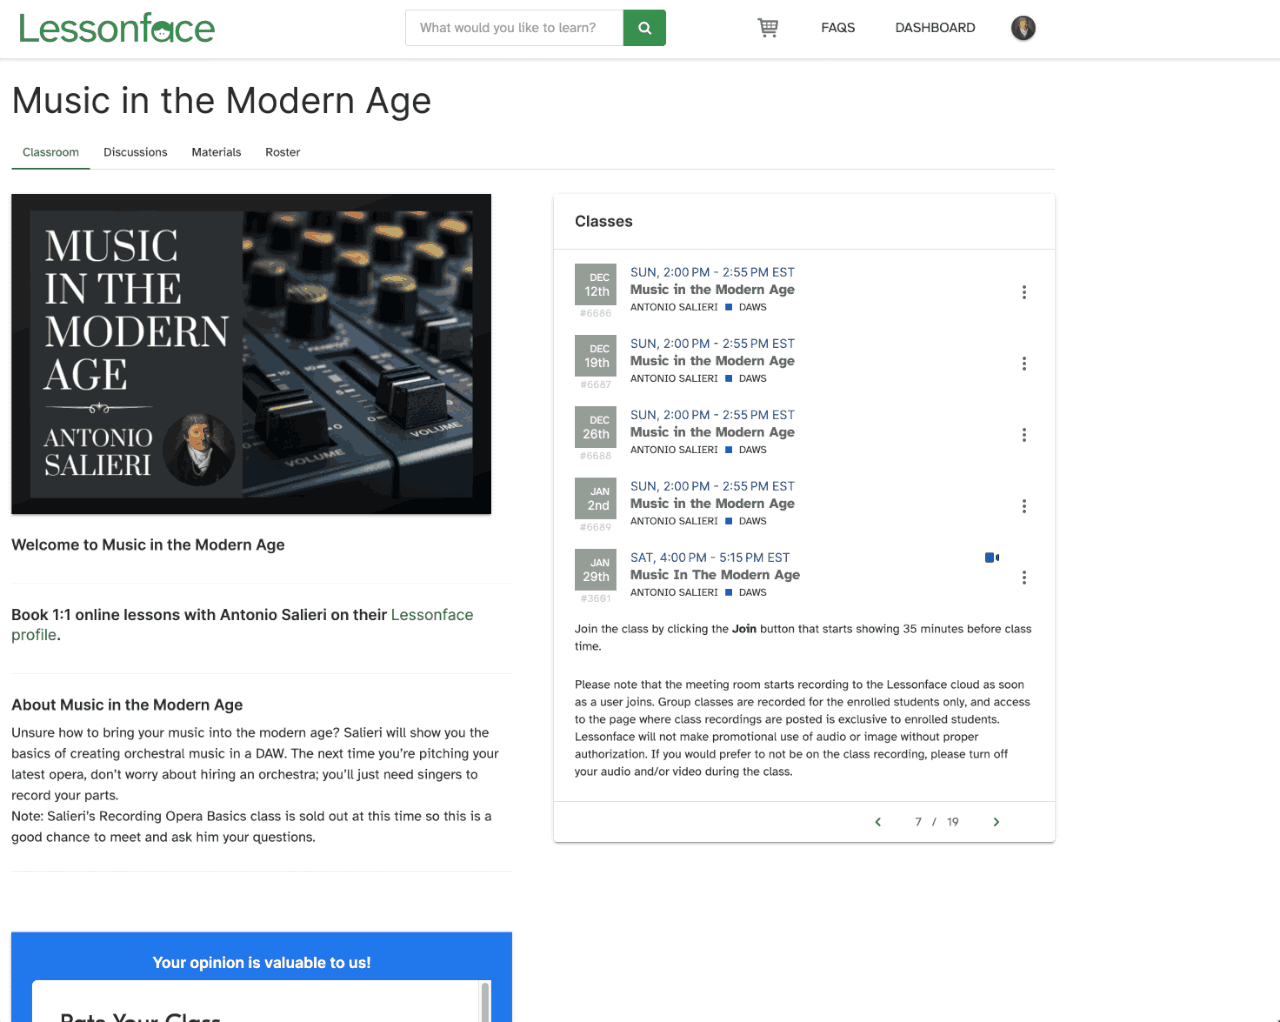
How do I start the group class?
As the teacher of a group class, you are the host and will start the class meeting. The "Join" Zoom link can be accessed from the reminder email, from the Lessonface Dashboard, and from the Enrolled class page. The Join button appears on Lessonface, and the link becomes active in the email reminder 35 minutes before the class start time. Note that the class session will start recording as soon as you join! As the host, you have the power to stop, or pause, and re-start the recording for the class. If you end the meeting, the session will end for everyone.
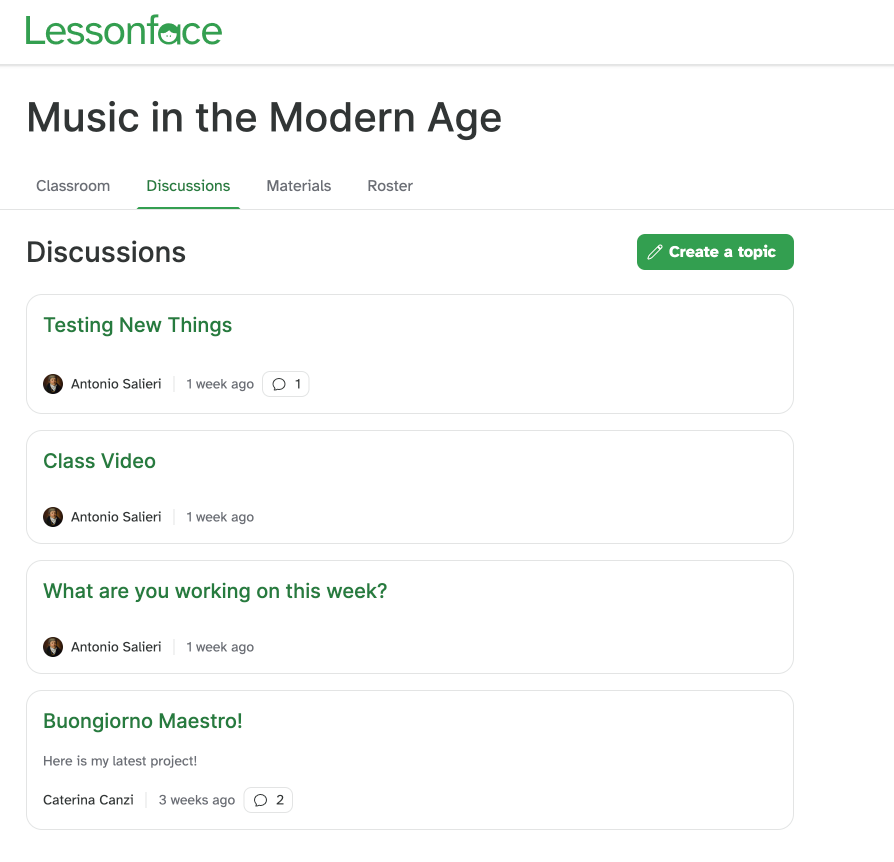
How can students discuss group class topics with their teacher and classmates?
Class members can interact directly on the class page through the Discussions tab. Click on any topic to join the conversation, or click the button to start a new topic. Text, videos, and images can be attached to comments. Teachers have the ability to moderate and remove any comments from the discussion.
Note: Classes don't have the Discussions tab enabled by default, and discussions are only available for adult classes. If the Discussions tab doesn't show in your class, you can contact [email protected] to get the functionality activated.
Are group classes recorded?
Group classes are automatically recorded unless you manually stop recording during the class. Access class recordings by clicking the class session and then clicking the recording file on the pop-up. Zoom meeting chat transcripts will also be available.
Payment Questions
The student missed the lesson, what do I do?
All teachers are protected by our 24-hour cancellation policy. If your student cancels at the last minute or doesn't join the lesson, you can acknowledge as “completed, unsuccessfully”. That generates the payment but prevents the student from leaving a review. If you prefer, you may reschedule the lesson with the student instead. Important: The teacher must be present on Zoom for at least 50% of the time of the lesson in order to acknowledge a lesson as “completed, unsuccessfully.” One idea for smoothing a missed lesson with a student would be to spend some of the time waiting for the student recording exercises or example songs for the student to review later.
When will I be paid?
Teachers are paid on Friday each week for lessons that have been acknowledged by Thursday at midnight Eastern time (US) of the same week. The longest a teacher would need to wait to be paid is 8 days, if a lesson occurs on a Friday you will be paid on Friday of the next week - so long as it is acknowledged by the next Thursday at midnight.
My payment isn’t correct, what’s up?
Sorry your payment wasn’t correct! We promise that it is a mistake, but it unfortunately happens sometimes. If your payment isn’t correct, send an email to [email protected] as soon as you notice, and we will correct the payment ASAP.
Do I get a 1099 from Lessonface?
Teachers based in the US who make over $600 within a year that is paid via Stripe or check will receive a 1099-NEC from Lessonface. If you have questions, reach out to [email protected].
Which payment method is best?
Direct Deposit: An option for US-based teachers. Your payment will be delivered to you free of charge, on an automated basis, so long as you link a US bank account to your Lessonface profile.
PayPal: This option is required for teachers located outside the US. PayPal has a fee structure that we do not control. If you are using PayPal, check directly with PayPal to best understand their policies on accepting payments.
Check: An option for US-based teachers only. We charge a processing and postage fee of $3/check.
More resources:
- Read more about how Lessonface works.
- Learn about teaching on Lessonface.
- Learn about fees, formats, and referrals on Lessonface.
- Explore the General FAQ for Students and Prospective Teachers.
- Read our policy for children (parents).